

IT’S A TUTORIAL!! MARKER LAYERING!!
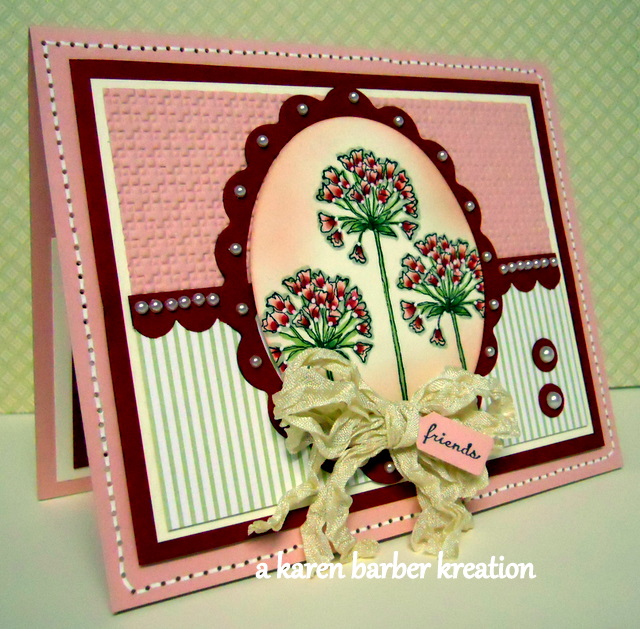 Okay, finally, I am actually doing a tutorial on the technique I call Marker Layering. I made that up myself. Big deal, right? This is only my second tutorial of this kind. So bear with me, and I hope I don’t delete any necessary steps. I tend to delete pictures, so if I get to the end without deleting, it will be no small miracle. Here I am showing you the finished card first and then I will show you how I made the main panel. I am in love with this new hostess only set from SU, it’s just my new favorite, and I think Elements of Style is feeling jealous, but it’s my old favorite. 🙂 Okay, on to step one. Well I guess I have to keep typing to move the next picture down….here goes….

First here is what you need to start – An outline stamp, a Black Stazon Pad, and here I used Very Vanilla Cardstock cut into an oval shape with my big shot. The Stazon ink is very important so your markers don’t run together. Nothing worse then when the black bleeds into the pink. NOT pretty. So stamp your image in black and let it dry.

You will now need to pull out those great SU markers. I use several shades of the same color for each picture. The main colors in my card are pink and green. So I am using Pink Pirouette, Blushing Bride, and Regal Rose for my pinks. Later I decided I wanted to punch it up one more time so I used a tad of Melon Mambo…but when I took this picture I was not anticipating that so that marker is missing. Just pretend it’s there. I’m no tutorial genius. 🙂 For greens, I used Pear Pizazz, Wild Wasabi and Old Olive.
 The first step is to color each petal of the flower the lightest pink, Pink Pirouette. Just one coat of ink, don’t go over and over it, just once, lightly. You can see how plain that looks, and that is where a lot of people stop with coloring, but it’s pretty boring and one dimensional. This is random, but I really don’t like Pretty in Pink. It reminds me of Pepto Bismal, or Ralphie’s bunny pajamas in The Christmas Story…but Pink Pirouette is perfection for a soft, light pink. Don’t use Pretty in Pink. Well I guess you can if you LIKE it. Anyway, just apply that first coat of ink all the way out to the end of the petal.
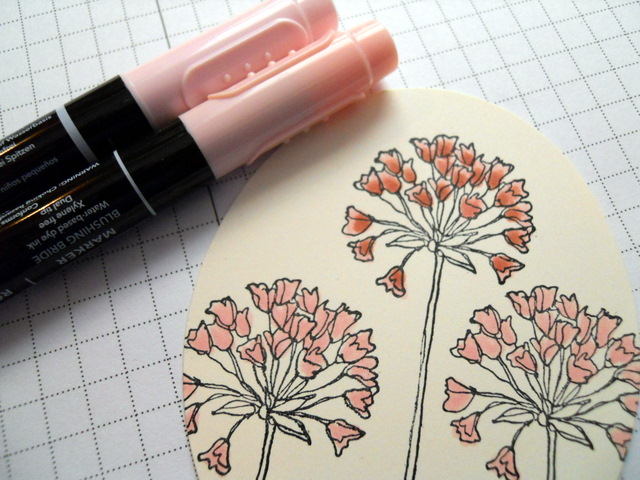 Here comes the magic now…..apply a second coat of marker using the next lightest color, which in this case is Blushing Bride. I am going to wear sack cloth and ashes for a full month when this IN color is discontinued. After that I will wear black every day for the rest of my life. This color is the extreme opposite of Pretty in Pink. It makes me think of soft roses, and baby blankets. It’s so perfect. So start at the bottom with this color and go out, BUT NOT ALL THE WAY…making sure you leave some of the Pink Pirouette there on it’s own. If you get carried away and color the whole thing, you just wrecked it and you should start over, no offense. 🙂
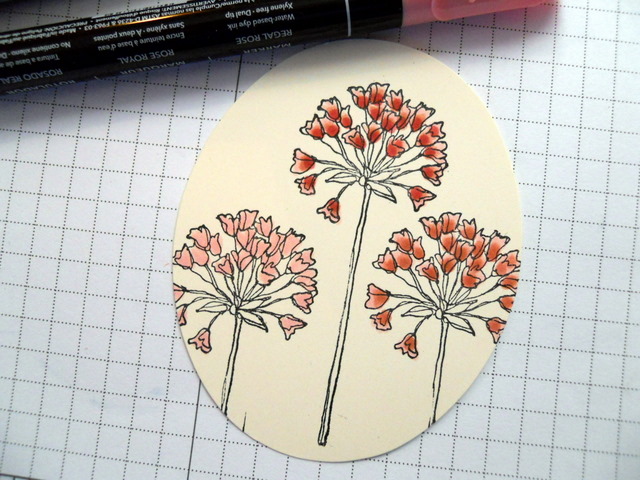
Now come in with some Regal Rose but just a tiny weeny tiny bit at the base of each petal. Don’t cover up all of the blushing bride, (heaven’s NO!) If you look closely at this shot here on the left, (click on it gets as big as your HEAD) you can see that left to right, flower number one has only the first pink, pink pirouette, while flower number two has all THREE pinks and flower number three has only the first two. (are you still WITH me??)You can see how much prettier that middle flower is with the three pinks all layered on to each petal! But remember, I decided it needed one more PUNCH….so……….
 Here I added in the Melon Mambo, and if THAT color doesn’t wake you up, check your pulse, you might just be dead! WOW Melon Mambo is WHOA…..PINK….HELLO, you better LIKE PINK if you use MELON MAMBO!!! (so I just use a TOUCH, a DOT, a TAD, a TEENY TINY BIT, at the base of each flower, and when you do this you will see the magic, how each time you add a darker shade at the base, the whole thing comes ALIVE!! Stay with me now, it should have only taken you about four hours to color all those layers on each little petal,,,,,stick with me,,,,,we are making progress!! It’s time to add some GREENERY!!! So purty! Ain’t that purty?
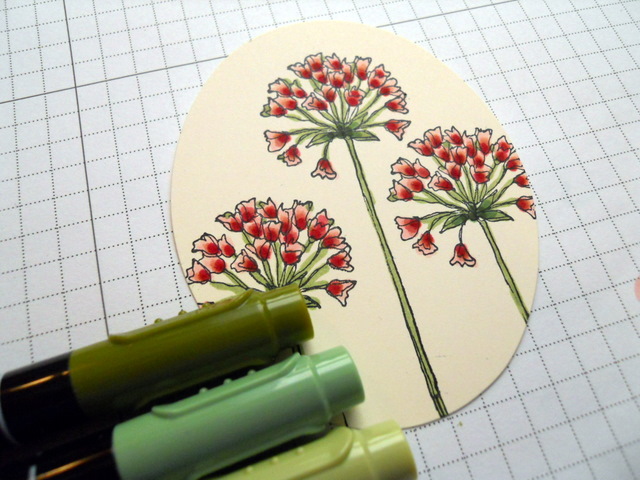
So basically now do the very same thing with the greens, start out with Pear Pizazz. Add some shading with the Wild Wasabi, and then just a TOUCH of Old Olive, that OLD FAITHFUL OLIVE. Gotta LOVE OLD OLIVE….right? Okay, we aren’t finished yet but we are getting there, slow but sure!! If you wanna do this for a swap card, make sure you design it with only ONE FLOWER!!! (or you will HATE me!!) I love to color, but NOT SWAP CARDS, not the SAME THING, OVER, and OVER, and OVER, and OVER, Mercy ME that’s SO BORING!!! BUT doing this once, a piece of CAKE!!! Okay, and, moving right along………the next thing you want to do is………..

Go around each and every flower and leave with a small shadow of Sahara Sand, it will wake the WHOLE THING UP! So pretty…..now look, ain’t that pretty????? Oh man, I love that look……(geez, I am starting to sound like Jan Tink here….but I do love this technique and yes, sometimes I do love some of my own cards….I mean why else would I keep on making them otherwise???) Okay, so do that all the way around your posies……..

Here’s a shot of all the markers I used in this picture…..I already named them so I’m not gonna name them again, you can just scroll up, okay? Oh alright, just to be nice, Pink Pirouette to Blushing Bride to Regal Rose to Melon Mambo on the flowers, Pear Pizazz to Wild Wasabi to Old Olive on the leaves, with a shadow of Sahara Sand……..and then one more thing to punch the whole thing up,,,,you just KNOW I had to use my old FAVORITE……
 WHITE GEL PEN!!!!!!! IT’S NOT FINISHED TILL YOU PUT A FEW DOTS OF WHITE GEL PEN HERE AND THERE….AND SEE HOW IT ALSO ADDS DIMENSION? THEN, LAST BUT NOT LEAST, I SPONGED THE EDGES WITH BLUSHING BRIDE INK WITH SOME SAHARA SAND INK ON TOP LEAVING THE CENTER ALONE SO IT SORT OF POPS OFF THE PAGE FOR YOU!!! I AM SO DARN EXCITED RIGHT NOW- I DID THIS WHOLE TUTORIAL AND THE ONLY PICTURE I DELETED WAS ONE I DELETED ON PURPOSE CUZ IT WAS SO SIMILAR TO THE ONE BEFORE IT I THOUGHT IT WAS REDUNDANT. Okay, enough with the capital letters. I ain’t getting TOO excited until this puppy is launched and all the pictures are still IN it…..I have such a tough time not wiping stuff out….I stand amazed at myself….oh go easy there girlfriend, Pride cometh before the fall……I’m gonna stop blabbing and try to get outta here with pictures intact……..can you believe I did SUCH a good job and I finally, finally, finally did this tutorial I said I was going to do for a long, long, long time…I did it!!! I am so happy with ME just now!!!! Go do some marker layering, honestly, it’s the BOMB!! Until next time………..Karen PS, If you are seeing this before FRIDAY, the 5th of August…..I will be hostessing a Dirty Dozen Challenge featuring this technique…go play!!! If you aren’t a member of SCS, become one!! 😉 It’s a virtual stamper heaven!! Okay, this is really the end….I’m a little wound up here…..doing the happy dance, I did it!!! (this never happens, a blog entry with no wipe outs….) Happy Day everyone!
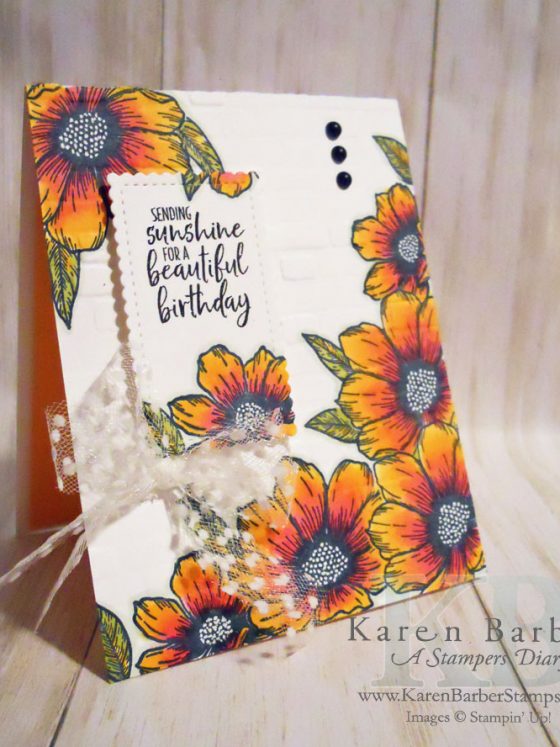


Emma Fewkes
August 2, 2011You nailed the tutorial, missy 🙂 I love, love, love your marker layering. It's fabulous. I'm going to tell you a secret though, nobody does it quite like you … 🙂 I'm going to give this a try for SURE! Love all your work, huge hugs, Emma x
Serena
August 2, 2011Awesome, gorgeous technique! Thank you so much for sharing your secrets! Can't wait to give this a try!
Anonymous
August 2, 2011Congratulations on a wonderful tutorial, Karen. I so agree with you about Blushing Bride!
Claire Lawrence
August 2, 2011it's an awesome card, and how wonderful to have the step by step pictures!!! I'd like to introduce you to Control Z…when you lose a picture he's your best friend. I know I've tried to introduce you to him before, but he must have not made an impression because you are still talking about pictures disappearing. When something goes away, hold control down and then hit Z (it's like "undo):0) sorry to be a smart alec, wanted to save you the frustration! it also works if you accidentally delete a paragraph or something;0)
Love, Clairey (now you probably want to control Z this comment, right?) :0)
Julie- justwritedesigns
August 2, 2011Thanks for the link, Karen! Your tute looks fabulous!
Dianne Hoffman
August 2, 2011Karen, this card is gorgeous! Can't wait to get this stamp set!Thanks for the tutorial.
Sandra Azzopardi
August 2, 2011Wow, what a fantastic tutorial! Thank you so much for sharing 🙂
Carol Dee
August 2, 2011Wowza so very pretty and al there. Great job with the tutorial. I plan to make cards today and will give this a try with my limited supply of markers. 🙁 Have a wonderful day. Hugs…
Lori Willoughby
August 2, 2011Hi Karen. Just subscribed to your blog about a week ago. THANKS SO MUCH for explaining the layering of colors. I have never understood how people do that, and you made it seem do-able!! 🙂
Unknown
August 2, 2011GORGEOUS coloring and great tutorial!!!
Patti Willey
August 3, 2011Wow! Thanks for explaining that so perfectly! I've been waiting for such instruction! Now I want/need more markers! And you don't own all the Copic Markers? You work with SU? Impressed I say, Impressed!
Julia Aston
August 3, 2011You make it look SO easy Karen! The coloring on these flowers is wonderful! thanks for showing us how you did it so we can at least ATTEMPT it!!
Linda Watts
August 3, 2011Great tutorial! Thanks so much for your time and effort to share this technique. Love it!
Newbie
August 3, 2011Karen, you did a wonderful job on the card AND the tutorial!! Your instructions, step by step, ALONG WITH PICTURES, made for an excelllent tutorial! Thank you soooo much!
Francie G.
August 4, 2011So very beautiful, Karen! Loved your tutorial! Fabulous!
Amanda Corbet
August 4, 2011Correction. Sorry it was a video by Carey Payette featuring your technique. I saw your name and thought it was your video. Either way….fabulous technique and tutorial!
Amanda Corbet
August 4, 2011Fabulous tutorial! I had previously watched the tutorial that you posted on stampin' connection. I made this card using your fabulous instructions! http://kraftingkreations.blogspot.com/2011/08/wisteria-wishes.html
Thanks so much for the fabulous tutorial and all the laughs while reading through it!
ANGELA STEVENSON
August 4, 2011You're amazing Karen…love this! Thanks so much for sharing! enjoy! 🙂
Anonymous
August 5, 2011Great tutorial. I will give this a try.
Beth Robinson
August 5, 2011What an awesome tutorial….as I read it I kept on getting more excited about going to do this technique ASAP….great for a class for beginners…..thanks for sharing!!!
Deana13
August 5, 2011Happened here from Paper Punch Addiction. LOVED reading your tutorial. I hope you never loose that great sense of humor! I'm going to go try your coloring technique. Good job!
Unknown
August 5, 2011Ha Ha! LOVE this technique and I REALLY loved your tongue-in-cheek narrative! SO humorous!!! You have every right to be doing the happy dance!! xxx
Vicki Dutcher
August 5, 2011YOU ARE AWESOME!! I am so proud of you and this fabulous tutorial that…. I have to try it!! (That says alot let me tell you!) Excellent job — love the touch of humor!
Jessica Lamb
August 5, 2011loved the tutorial, loved the card! and can't wait to try out this technique! Thanks so much for sharing it with us! Happy scrapping! – Jessica
Kathy Bradley
August 5, 2011Karen,
As always, your card is a work of art – gorgeous and elegant! And, what a wow tutorial – you did a great job and kept some humor in there too!
Wonderful blog!!
Kathy/101Airborne
Jodi
August 5, 2011Great tutorial! Thanks for all the great tips. I'm new to the SU markers, so just getting the hang of them. Seem to go over too many times so it gets too darn. Will keep working on it. Will definitely give this layering of color a try. By the way, I did choose pink pirouette over pretty in pink on my last order. So soft & pretty.
Judy
August 5, 2011Great tutorial and the end result is beautiful. Thank you for sharing your time and talent.
Heather S. (Isaiah 40:31)
August 5, 2011Loved your tutorial Karen. And your narrative had me chuckling all the way to the end. Congrats on getting it up on your blog and thanks for sharing with those of us who didn`t pass Colouring 101 in Kindergarten. We NEED this kind of step by step to make our images look sorta halfway good! Thank you!
Charlene Merrick (LilLuvsStampin)
August 5, 2011Meez Karen, you so totally quack me up! I love your zany funny narrative throughout your FAB tutorial! Yes, I am patting you on the back saying "atta girl!" You 'done' real good. I am going to have to give your tutorial a try. Oh, one more thing….don't hate me because I love Pretty in Pink…..k? (Note to self: purchase Blushing Bride—-beautiful color!) Hugs!
Ilina Crouse
August 5, 2011You crack me up! I love, LOVE, love your tutorial and I will try it out, hopefully it will be soon.
Joanne Travis
August 5, 2011Thanks for showing the tutorial, Karen. Your card is stunning, as always!
Harriet Skelly
August 6, 2011OMG Karen – excellent tutorial – thanks so much for putting it together. I never enjoyed reading a tutorial as much as this one! Harriet
Carole Campanile
August 6, 2011Thank You!!! What a fabulous tutorial. Of course there was one problem …. a warning. Something like "Do not drink tea/water/soda/whatever while reading this tutorial" Would have saved my monitor from the spray of tea when I got to the part about Blushing Bride. ROFLMAO!!!
I know how you feel, I'm still not over the loss of Cool Caribbean and I'm down to my last 6 packs of paper with slightly more then one re-inker left. I gave up on the black however because its just too damn hot here in Texas to be wearing that color in the summertime. 😉
Your cards are awesome and you are very inspiring.
Thank you again and this is one DTGD challenge I plan to partake in.
Carole
Diane Van Horn
August 8, 2011Wow! You have a right to be proud. This is a great tutorial, your pictures are great and your explainations are easy to follow. Thanks for all your inspiration.
Amy Rusaw
August 8, 2011You are so funny! I loved reading your tutorial, not just for the technique but for the humor! Thanks for making me laugh!
Danielle Champagne
August 9, 2011It is not boring at all, very intersting, I would say. Perfectly clear, and I will try this for sure. Love your card very much! Hugs… from Montreal
Bronwyn Eastley
August 13, 2011Marker layering!! – what a fabulous tutorial for someone like me that is challenged in the colouring in department. TFS.
KER
August 13, 2011THANKS!!!!!
Tandra
August 14, 2011totally rad Karen! So glad I found your blog! My good friend Brandi Wiggins sent me here!!!
Thanks for a great tutorial!
JanTink
August 14, 2011I have corrupted you. My work here is done. =-)
Allison
August 16, 2011Absolutely gorgeous! Thanks so much for the tutorial!
beth rush
August 16, 2011thank you so much for that tutorial! and such a pretty card. i have been doing this with a blender pen but the markers look so much better and more controlled. i am definalty going to try this out!
Edie
August 16, 2011Love it, love it, love it. Great tutorial and I love your humour!
Anonymous
August 16, 2011Karen Thanks So Much!! I'm a new demo and need alot of new things to learn. I will try it, It is so pretty! Thanks so much Hon! Victoria Hanson victoria@heartofiowa.net
Kim
August 16, 2011Totally awesome Karen!! Thank you so much for sharing that wonderful technique of yours. Your tutorial is awesome; you have reason to be proud.
Barbara Joyce
August 19, 2011Karen, not only is this technique gorgeous, and your tutorial is super-clear and easy to follow, but it is a scream to read! You are as funny as Jan Tink, and that's saying somethin'! I am so excited because I have this set and all the schtuff I need to duplicate the sample, so off I go to give it a try! Thanks so much for taking the time to write up the tutorial!
Anonymous
August 19, 2011Thanks for sharing such a fantastic technique! You explain it so it is easily followed by even the "not so creative" person. I can't wait to try it. Guess I have to purchase yet another product as I don't have any staz on ink.
Catherine Harwood
August 20, 2011I'm with you on Blushing Bride — and I'll wear the sackcloth with you. You are the funniest write and I can just hear you teaching it this way in person. Thanks SO much for sharing this.
bensarmom
August 22, 2011Karen,
I tried your beautiful tutorial and want you to see the results here.
http://www.splitcoaststampers.com/gallery/photo/2036347?cpage=1
THanks for a great tutorial and for sharing your beautiful way of coloring. You area master artist for sure.
Jennifer Reynard
August 22, 2011Wow, no wonder you are doing the Happy dance…. well maybe you are tired out by now, I'm a little late finding this awesome post. Make sure you frame this beauty. It warms my heart just looking at it!! Pink is one of my favourite colours.
Thanks for the post and really enjoy your sense of humour!! 🙂
Jennifer, Calgary
Anonymous
August 31, 2011Awesome tutorial and I LOVE the card. thanks!!!!
g
Anonymous
September 6, 2011Absolutely stunning!
TFS
Amanda
September 11, 2011What a beautiful card and thank you for the technique…I am not sure I have the patience but I am trying. Dorothy S. from SCS recommended your tutorial and I am trying with copy your technique with the nicest things set…maybe I am just getting the color combo wrong but looking at your cards makes my mouth just drool.
Ihr Hobby-crafts24 Team
November 14, 2011Dear Karen , You make so wonderful and lovely works! I enjoyed the visit on your site. Many thanks for your beautiful inspirations and Tutorials!! Please take a look on my Blogspot. Hugs from Marina.
Paulette
January 10, 2012Loved this tutorial and can't wait to try it out for myself. The flowers look dynamic! Also – love your sense of humour! Laughed right through this tutorial! Thank you~ Paulette
Paulette
January 10, 2012Loved this tutorial and can't wait to try it out for myself. The flowers look dynamic! Also – love your sense of humour! Laughed right through this tutorial! Thank you~ Paulette
Tara Bilbao
February 21, 2012Oh My Goodness – This is such a fantastic tutorial. I love your style of coloring and you made it so easy with your step by step instruction. I can't believe what a difference a little sahara sand can make. I actually started going the way of Copics but gave up . I have so many lovely SU colors and now I can use your technique. Now if we only had more purples to work with! Thanks again
Barbara Joyce
April 27, 2013Karen, I love this marker layering tutorial, and just came back to refresh my memory on colors and technique. Aren't you thrilled that Pretty in Pink is going away and Blushing Bride is coming back?!?! You can stop wearing black every day for the rest of your life! Personally, I'm sad, 'cuz I love Pretty in Pink–although ever since I first read this post way back in August of 2011, every time I look at PIP, I think Pepto-Bismol. Thanks so much for that! But seriously, thanks again for this wonderful technique and tutorial!
Barbara